Friday, January 27, 2012

Doing the Quilt Along #4 with Leah Day

Ok, so I haven't been doing all of the Quilt Alongs from the Free Motion Quilting Project, but I had a few minutes today before work and I decided to do Quilt Along #4 - Quilting on a Line. My machine was already threaded with black thread and I had an extra practice sandwich lying around, so I figured "why not?"  Plus, the black thread on my light fabric is very easy to see. I drew some lines and a pattern with my water soluble marker and gave it a go.


Let me tell you, it was not so easy. Trying to make the needle go somewhere specific (namely following a line or pattern) is much more difficult than random (or semi-random) motions/meandering/stippling. And, I find it much harder to find the balance between the pedal speed and the movement of my hands. The first line I did, I noticed my stitches were really small because my foot was going faster than my hands. I think it was because I was focusing so much on following the line, but my foot still wanted to go the same speed as it does when I am stippling (much faster). When I do stippling I place a book behind the pedal lodged against the wall to do two things: 1. keep the pedal from sliding away from me and 2. give me a comfortable maximum/steady speed. I got so used to that speed (it's perfect for stippling) that I realize I am unable to go other speeds comfortably. I guess this means I need to start practicing lines and patterns more often.

I also noticed that I had trouble seeing where I was going sometimes, depending on which way I was moving the fabric. I really hated going behind the needle where I could not see and also, making the straight lines go sideways. More practice is definitely necessary.


A little more straight line practice and I filled in the rest with some more stippling practice.


The below is a photo of some large scale stippling practice that was encouraged to try in Quilt Along #3:


I was using a sandwich that I had previously practiced on with other colors of thread. I had to stop near the edge on the upper right and you can see I got a knot and it does not look smooth. Black thread on light material is SOOOO noticeable. I prefer a matching thread and a busy pattern, so you do not see the quilting so much.  I ended up finishing my third quilt the other day and I used a large stippling. It turned out well, but I cannot show it yet because it is a gift and I do not want to risk them seeing it yet.


Until next time,

Mike.


Pin It!

Tuesday, January 24, 2012

My second quilt is finished.

This is actually the first quilt project I ever started, but it was the second project I ever finished. I posted about this quilt originally here. I think I am getting better at the free motion quilting. This one definitely seemed to go much smoother than the first. I learned a few things and tried some new things.

This was the first time I used gloves. I purchased Fons & Porter Machine Quilting Grip Gloves and I have to say they work wonderfully and gloves made a huge difference! I continued to use the Sullivans Silicone Sewing Spray (which I do not think I mentioned before), but I have discovered that it helps initially, but eventually it needs reapplied and for me that is really a ton of hassle. After I finished this project I ordered a Supreme Slider (recommended by Leah Day). We'll see how that goes. I am getting some ugly stitches (which I leave in because I do not have the patience to be pulling them out and it adds character). The main reason for the ugliness is two things:

1. Even in the needle down position, when I stop to adjust (or whatever) I let go of the quilt a tad too soon before the needle is finally down and the quilt shifts. I think this could be my machine's fault, because it pauses right before it "remembers" that it is supposed to end in the down position.

2. I find myself pulling with my fingertips while in the middle of quilting and when whatever is hanging me up lets loose my hands jerk the quilt quickly in the wrong direction.

So, I've learned to wait until the needle is in the down position before I let go of the quilt. I have also been a ton more diligent about making sure the quilt is not draping or hanging over anything. This is the main cause of the dragging and jerking. Although, I could learn to stop more when I feel this drag coming on. I just hate to stop in an area that is going to obviously reflect that I stopped and restarted. Even though the ugly stitches don't bother me in the overall scheme, I still try to minimize them.

 I free motion quilted the blocks. I used mostly fat quarters with colors that would remind you of the Wizard of Oz. (I have a room that is mostly decorated this way, not the room in picture.)
 I straight line (curve) stitched the borders. I used a rainbow colored thread, but you really don't see it too much unless you are up close. I did not use a walking foot because my machine has a built-in feed system that works fine when activated for getting the sandwich to move through. Although, I've decided that I don't like doing it, because I get much more puckering than I do with FMQ because the foot is pressing down on the quilt top.
Since the theme of the front was sort of Wizard of Oz, I used some fabrics on the back that are related.


I have to say I was really impressed with the overall look and feel of the quilt. As soon as it was finished, I already had the material ready for the next quilt.

I get the feeling that no one is reading this blog (except me), but talk to you later anyway!

Mike.

Update: Up Close Picture of the Rainbow thread:


Pin It!

Wednesday, January 18, 2012

How do you sign your quilt?

I would be interested to know how or what techniques everyone uses to sign their quilts. I do not have many readers at this point since I only started the blogging recently (and I'm not sure I have any!). I have seen some people that use embroidery to write something on the back (which I do not have the capabilities). I have also heard of free motion signing of the back. I know that my sister-in-law uses a laundry marker to write something on the back. My Aunt C. likes cats so she uses several fabrics to make the backs and at least one of them has cats in it. I am a Wizard of Oz fanatic (and from Kansas) so for my first 2 quilts I used some fabric (not all) on the back that had ruby slippers on it. Has anyone tried anything else that works well and looks awesome?

And here is a picture of some curtains that I made while I was in the too scared to free motion something phase:


The material has tiny little dark green leaf patterns on it. I was going for the forest look since they were for the guest bedroom which is totally decked out to look like Dorothy Gail's bedroom.

If you are reading this, leave comments so I know someone is out there :)

Mike.


Pin It!

Tuesday, January 17, 2012

I finally did some free motion on a real quilt.

I just started doodling. At first I was unsure of my jumping right in. I tried to do some wiggling, loops, stippling, meadering, whatever you want to call it. It started to look like someone puked a big blob of thread on the quilt. But in the end, the overall effect was just fine... and it turned out to be some great practice. I made many ugly stitches, but I just kept right on going. I played with speed, with designs with direction and it all wasn't really that bad.

I spray basted the quilt using Patsy Thompson's method and it worked out great. I had that baby basted in 15 minutes (lap sized blue ribbon quilt) and I definitely loved not having to stop to take out pins. I did not use gloves. I used silicone spray on the surface of the plexiglas extension. Even though, I was still having difficulty moving the bulky quilt smoothly. (On the next one I used gloves and boy did it make all the difference.)


After I had it finished and had binded it, I washed it and I love the way it looks. It's got that crinkly quilt effect. I know I have more pictures of it that I will have to share at some point.

Anyway, I then moved on to the rainbow block quilt and I am even much happier with how the quilting turned out on that one. I will write about it next time.

Mike.

Update: I got some pictures of the finished quilt...


Pin It!

Friday, January 13, 2012

Whipping up some potholders.

In my last post I decided that quilting a large project was just too soon for me. I came up with the idea that since Christmas was just around the corner, everyone needed potholders made by yours truly :) It turned out to be great practice for free motion, stitch in the ditch and using a walking foot. I also got much need practice for doing binding (on a smaller scale).

 These are 9 x 9. I gave these to Aunt D. She is from Lithuania so I used the colors of the Lithuanian flag!
 The quilting I did in straight lines, one inch apart, but I did it free motion.
 For batting on all the potholders I used something that was made for potholders that would retain heat and be fireproof.
 These are my "groovy" potholders I made for T & D. They are my "hippie" friends :)
 I used cotton thread on everything (Gutermann) because I was afraid that the polyester might melt.
 I did stitch in the ditch with the walking foot on these and the next ones below. My machine has a built in walking mechanism that you can engage and disengage.
 I did these for my friend M. visiting from Massachussetts. I was told that "Toile" would go with her kitchen.
 Making the loops was an experiment in itself. I got better at it by the time I made these. I ended up starting right on the corner and when I got to the end I kept right on going with sewing the binding strip (sans the layers). Then, when I had a long enough strip, cut it to the desired length, looped it around and sewed it down to the back.
 I was on a time crunch with these because Christmas was approaching and the only material I could find that was toile and blue was a canvas material, but it worked out well.
While the Lithuanian potholders were 9 x 9 inches, the others were 7.5 x 7.5 inches, which I thought was a more ideal size.

Anyway, the potholders were a real hit at the gift exchange on Christmas! The only thing left for me to do now was start quilting a real quilt. But, how should I do it? Free motion? Walking foot? I couldn't decide. I only knew that the blue ribbon quilt was getting done next, and I dreaded making a mess out of it! Me being the impatient, "what's the quickest way for the best result" type... I jumped right in!

Stay tuned.

Mike.


Pin It!

Thursday, January 12, 2012

What to do now that my first quilt top is finished?

About 7 years ago I got the inkling of an idea that I might want to learn how to quilt, so I bought a couple of books on how to quilt (Quilting for Dummies, etc.). I found a beginner project in one of the books and went out and bought everything they suggested I need (many things I still have and never used). So, I have this material that I've carted around (2 addresses later) that is sitting in my basement in a storage container (with the book that had the project I was planning). After finishing the top of the rainbow block quilt and watching several videos and reading a multitude of tutorials on free motion quilting, stitch in the ditch and quilting with a walking foot, I was scared that I would ruin the rainbow by trying to quilt it with no actual practice (other than practice quilt sandwiches), and decided to take up that old project stored in the basement.

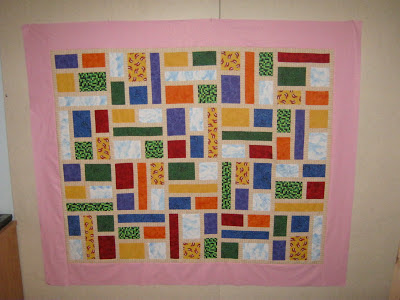
It had very little material in the "recipe" so I started wondering (at this point I had a concept of how much material a project would take)... I started wondering if there was room for miscuts. As it turns out, there was enough material, but the size of this quilt was supposed to be for a wall. Here is a block and the finished front:


I think the pattern is called "Ribbons."

I'm not the kind of person to hang a quilt on the wall. I like a little functionality. If I'm gonna hang it on the wall, it better be detachable in case of a blanket emergency! And, it needs to cover (at least) my legs!

So, at the advice of my Aunt C. I decided to be a little creative and make it bigger. At this point, the material was so old, I knew I would never find more of the same to make more blocks to extend the quilt. I took it to Quilter's Corner (nice store) when I was in Virgina for Thanksgiving visiting the family and picked out more fabric that would go with it. Now the front looks like this:


The original design would have stopped right before the white and light blue print checkered border. Now I have a 60 x 60 inch throw.  But at this point, I'm still afraid to quilt it. So, I start working on making a back for this quilt and the rainbow quilt.

Instead of using one print or color for the back. I like to use a variety of fabrics and at least one print that will tell the user/recipient that I made it, like a signature. My friends and family know that I like the Wizard of Oz (and I'm from Kansas) so I try to use something that will reflect that on the back.


These are the fabrics that I chose. Some were left over from the front. The yellow with red print is actually little ruby red slippers. I hang it over the quilt top on my wall to make sure I have enough before I start cutting and sewing. And, I can see sort of what it will look like.

Now it was time to practice quilting on some more sandwiches. Here's a picture of one of my first ones:


I was really just doodling and getting a feel for free motion. It was such a headache in the beginning, I almost gave up. I was having so much trouble, I couldn't imagine putting a bulky quilt in the machine and trying to do this. Just getting halfway decent stitches was a problem, not really because of me, but because I would always forget to set up something correctly with my machine after putting on the darning foot. So, I decided, everyone needs potholders for Christmas! Stay tuned.

Mike.

Pin It!

Wednesday, January 11, 2012

How it all began...


So, I was telling my Aunt C. in San Diego one day that I had always been interested in learning how to quilt. Next, thing I know she invites me to come to San Diego for a quilt show. (I live in the NYC area, by the way.) So, I packed my bags and got on a plane. This was really just to see her, and the quilt show was just another reason to go.

Next thing I know, I'm buying all sorts of tools, fabric, fat quarters, patterns, you name it (at the show and her favorite store, Rosie's). We go back to her place and she gives me the "Introduction to Piecing" class (and she's a good teacher) which includes how to use a sewing machine, how to cut fabric using a rotary cutter, etc. Next thing you know, I'm in the thick of it, and I'm lovin' it! This was about 2 years ago and that top row of blocks in the picture was my first "row."

Then in May of 2011, I came back for a visit (when this picture was taken) and continued my work. It was then that I received my gift: a brand new sewing machine (Pfaff Expression 2.0). A very nice gift from my Aunt C.!!! After we sewed all weekend (with my sister-in-law who was there also), I had it shipped home. Mind you, the only thing I was halfway decent with at this point was piecing. The machine sat around for few months not getting used while I waited to get a setup that was suitable for piecing. The love of my life is very handy with building things, so he created a wall (similar to the one in the picture) for putting the pieces on. I got a new iron (Reliable IronMaven J420) which I quickly fell in love with! (It was cheapest on Amazon.com and worth every penny.) I bought a used sewing table from someone's garage, then I was good to go. I finished the front of this quilt in no time (and I do not have much free time, usually only on the weekends). See below for the finished front.


My Aunt C. has her quilts sent to someone for quilting, yet I was feeling a bit adventurous at this point. I started doing some research on doing the actual quilting on a home machine (online tutorials and videos) and I decided I should at least try it and if I decide it's too painstaking or takes to much time or I basically just don't enjoy it, I will start having them quilted by someone else. At least I could say "been there, done that."

Seeing as I have just started this blog, I could go on forever to get to where I am today. I am planning to continue writing about my journey another day. I hope that I can find some time in my days to keep up with this. Thanks for reading.

Mike.

Pin It!